How to Build a Rest Api Using Node.Js And Express: A Step-by-Step Guide
Building a REST API with Node.js and Express is a vital skill. It powers many web applications today.
REST APIs allow different systems to communicate. They provide a way to access and manipulate data using standard HTTP methods. Node. js and Express are popular choices for creating these APIs due to their efficiency and simplicity. Whether you are new to coding or an experienced developer, learning this will boost your skills.
In this guide, I will show you how to build a REST API step by step. We will cover setting up your project, creating endpoints, and testing your API. By the end, you will have a working API and a better understanding of how these technologies work together. Let’s get started!
Introduction To Rest Apis
Building a REST API with Node. js and Express involves understanding server-side JavaScript. Begin by setting up Node. js and Express to handle HTTP requests efficiently. Use Express to define routes and structure your API endpoints, ensuring seamless communication between the client and server.
Building a REST API using Node.js and Express can transform the way you handle data and interact with applications. Before diving into the technical specifics, it’s crucial to grasp what REST APIs are all about. Understanding the core concepts helps you appreciate their significance and effectively implement them in your projects. ###What Is A Rest Api?
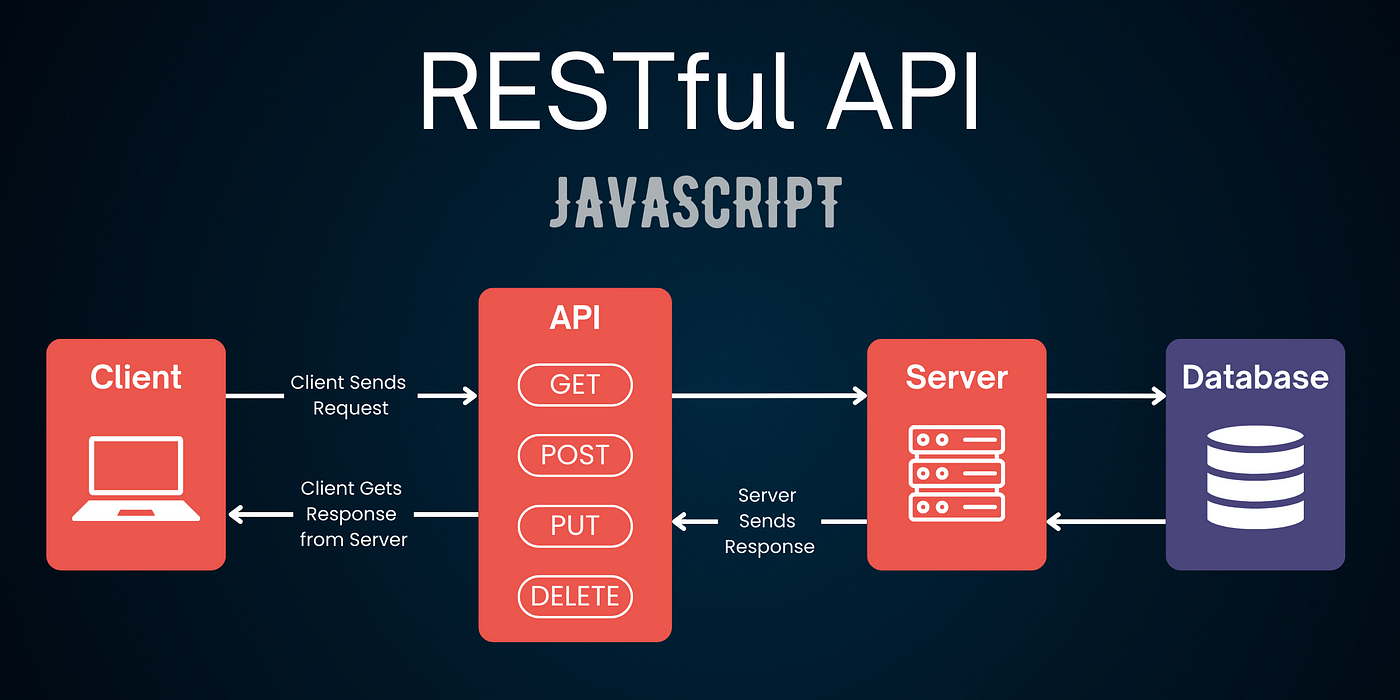
A REST API, or Representational State Transfer Application Programming Interface, is a set of rules for communicating between a client and a server. It relies on standard HTTP methods like GET, POST, PUT, DELETE to perform actions. Think of it as a waiter in a restaurant, taking your order (data request) and bringing back your meal (data response). REST APIs are stateless, meaning each request from a client contains all the necessary information for the server to fulfill it. This simplifies interactions and enhances scalability. Imagine ordering from a menu where each dish is clearly defined, ensuring you get exactly what you asked for without confusion. ###Benefits Of Rest Apis
REST APIs offer several advantages that can streamline your development process. First, they are flexible and can be easily used across different programming languages and platforms. This universality means you can integrate them into various applications without hassle. Additionally, REST APIs are scalable, making them ideal for growing applications. Whether you’re handling a few requests or millions, the stateless nature ensures smooth performance. Picture a highway designed to handle rush hour traffic without bottlenecking. REST APIs also boast a simpler learning curve compared to other protocols, allowing developers to quickly grasp and implement them. You don’t need to be a coding wizard to start building with REST APIs; even if you’re just getting started, they provide a straightforward path to follow. In your journey of creating a REST API with Node.js and Express, consider what unique solutions or efficiencies you can introduce to your project. How can you leverage the power of REST to enhance user experience or streamline operations? The possibilities are vast, and with the right approach, your application can truly shine.Setting Up Your Environment
Prepare your development space by installing Node. js and Express. These tools are essential for building a REST API. Set up your project directory and initialize it with npm to manage dependencies easily.
Setting up your environment is the first step in building a REST API. A well-configured environment ensures smooth development and reduces errors. For this task, Node.js and Express are essential tools. They help in creating efficient and scalable server-side applications. Before starting, make sure your system is ready to host these technologies.Installing Node.js
Node.js is a JavaScript runtime built on Chrome’s V8 engine. It allows you to run JavaScript server-side. To start, download Node.js from the official website. Choose the LTS version for stability. Once downloaded, run the installer. Follow the on-screen instructions. After installation, verify it using the terminal or command prompt. Type `node -v` to check the installed version. This confirms Node.js is ready to use.Setting Up Express
Express is a minimal and flexible Node.js web application framework. It provides a robust set of features to develop web and mobile applications. First, create a new directory for your project. Open your terminal and navigate to this directory. Initialize a new Node.js project by typing `npm init -y`. This creates a `package.json` file. Next, install Express using npm. Run the command `npm install express –save`. This adds Express to your project dependencies. You are now set to start building your REST API with Express.Creating Your First Endpoint
Creating your first endpoint is one of the most exciting steps in building a REST API using Node.js and Express. Think of an endpoint as a door to your application. It’s where the outside world can communicate with your server. Let’s dive into creating your first endpoint and making your API accessible.
Understanding Routes
Routes are the paths through which your application responds to client requests. In simple terms, routes define how your server handles incoming requests to specific endpoints. Imagine them as the address on a letter; without it, the letter (request) wouldn’t reach the right destination.
In Express, you define routes using the app.get(), app.post(), app.put(), and app.delete() methods. Each method corresponds to a different HTTP verb, and each verb has its unique purpose.
Creating A Basic Get Request
A GET request is used to fetch data from the server. It’s the most common type of request you’ll deal with. Let’s create a basic GET request to understand how it works.
const express = require('express');
const app = express();
const port = 3000;

app.get('/', (req, res) => {
  res.send('Hello World!');
});

app.listen(port, () => {
  console.log(`Server is running on http://localhost:${port}`);
});
Here’s a breakdown of what’s happening:
- Import Express: We start by importing Express, which is the framework we’ll use.
- Create an instance: We create an instance of Express and store it in the
appvariable. - Define a route: Using
app.get(), we define a route that listens for GET requests at the root URL'/'. - Send a response: When a GET request is received, we send back a simple ‘Hello World!’ message.
- Start the server: Finally, we tell our app to listen on port 3000 and log a message when the server is running.
Now, start your server by running node yourfilename.js in your terminal. Navigate to http://localhost:3000 in your browser, and you should see ‘Hello World!’ displayed.
What other endpoints can you create to enhance your API? Try adding more routes, such as a POST request to handle data submission, and watch your API grow.
Handling Different Http Methods
Handling different HTTP methods is crucial in building a REST API. Each method serves a specific purpose, allowing interactions with the API. Node.js and Express offer a straightforward way to manage these methods. Understanding their use enhances your API’s functionality.
Post Requests
POST requests create new resources on the server. They send data to the server, which processes and stores it. In Express, handle POST requests using the app.post() method. Ensure your server can parse incoming data. Use middleware like body-parser to handle JSON payloads. Always validate and sanitize incoming data to prevent security issues.
Put And Delete Requests
PUT requests update existing resources. They replace the current representation of the resource. Use app.put() in Express to handle these requests. Ensure you identify the resource by a unique identifier. Always check if the resource exists before updating.
DELETE requests remove resources from the server. Use app.delete() in Express for these operations. Like PUT, identify the resource by its ID. Confirm the resource exists before attempting to delete it. Implement error handling to manage cases where resources are missing.
Using Middleware
Middleware simplifies the process of building a REST API with Node. js and Express. It acts as a bridge between requests and responses, handling tasks like logging, authentication, and data parsing. By structuring middleware effectively, developers ensure efficient, scalable, and maintainable API solutions.
Using middleware is a fundamental aspect of building a REST API with Node.js and Express. Middleware functions sit between the raw incoming request and your application’s logic, allowing you to handle tasks like logging, authentication, and data parsing. Understanding and using middleware effectively can make your API more robust and maintainable. You might wonder, what exactly is middleware and how can it benefit your API development process?What Is Middleware?
Middleware in Express is essentially a function that has access to the request and response objects. It can modify the request object, the response object, or even end the request-response cycle. Think of middleware as a conveyor belt in a factory. Each middleware function is a station on the belt where something specific happens to the request or response. This ensures all necessary processes are completed before the request reaches its final destination. Middleware is executed sequentially, providing a structured way to build up functionality. This makes it easier to manage and scale your application.Common Middleware Functions
Several common middleware functions are essential for building a REST API. – Logging: Middleware can log each incoming request, which is invaluable for debugging and monitoring. The `morgan` package is a popular choice for this task. It provides a simple way to log requests to the console. – Body Parsing: Before you can use data from a POST request, you’ll need to parse it. The `body-parser` middleware can handle JSON and URL-encoded data, making it easy to access the data in your routes. – Authentication: You can use middleware to check if a user is authenticated before accessing certain endpoints. Passport.js is a robust middleware for handling authentication in Express. – Error Handling: Middleware can catch errors in your application, providing a way to return a consistent error format. Express has a built-in error-handling middleware function, which makes it easy to manage errors across the board. When I first started using Express, I overlooked the power of middleware. I spent hours writing repetitive code, only to later realize that middleware could handle these tasks more efficiently. Have you ever found yourself rewriting the same code across multiple routes? Middleware could be your solution. By centralizing these functions, you can save time and reduce errors in your API development process.
Credit: nordicapis.com
Connecting To A Database
Connecting your Node.js app to a database is crucial. It allows data storage and retrieval, enabling dynamic functionality. Whether you’re building a simple app or a complex system, database connectivity is key. Let’s explore how to efficiently link your app to a database using Node.js and Express.
Choosing A Database
First, select a database that suits your project’s needs. Popular choices include MongoDB, MySQL, and PostgreSQL. MongoDB is great for flexibility and scalability. MySQL offers robust support for relational data. PostgreSQL is known for advanced features and reliability. Consider your data structure and scalability requirements. Choose a database that aligns with your goals.
Setting Up Database Connection
Next, establish a connection between your Node.js app and the database. Use libraries like Mongoose for MongoDB or Sequelize for SQL databases. Begin by installing the necessary packages. Configure connection settings with your database credentials. Ensure security by handling sensitive information carefully. Test the connection to confirm it works correctly. Handling errors efficiently is crucial for maintaining stability.
Connecting to a database is an essential step. It enhances your app’s functionality and user experience. With proper setup, your application can efficiently interact with the database. This ensures smooth data operations and a seamless user experience.
Error Handling
Error handling is crucial in building robust APIs. It ensures your API responds properly during failures. This keeps user experience smooth and consistent. Let’s explore common errors and how to create custom error messages.
Common Errors
Every API faces errors. Network issues might disrupt communication. Invalid data can break processes. Missing resources often lead to failures. These common errors need effective handling. Proper handling prevents crashes and confusion.
Consider validation errors. When data doesn’t meet criteria, your API should respond clearly. Unauthorized access errors occur when users lack permissions. Resource not found errors arise when requested items don’t exist. Each error type requires a specific response.
Creating Custom Error Messages
Custom error messages enhance user experience. They provide clarity and direction. Instead of generic messages, tailor responses. Inform users about the exact issue. Suggest possible solutions or actions.
Use clear language in messages. Avoid technical jargon. Maintain a friendly tone. Guide users through troubleshooting steps. Custom messages help users understand errors better. This reduces frustration and improves interaction.
Implement custom messages in your code. Use middleware to catch errors. Define unique responses for each error type. This ensures your API remains user-friendly. Custom error messages make debugging easier for developers.
Credit: blog.stackademic.com
Securing Your Api
Securing your API is crucial for protecting sensitive data. It prevents unauthorized access and misuse. A well-secured API builds trust with users and clients. Node.js and Express offer robust tools for API security. You’ll need to focus on authentication and authorization. These are key components of API security. Let’s explore these techniques in more detail.
Authentication Techniques
Authentication verifies user identity. It ensures users are who they claim to be. Common techniques include token-based authentication. JSON Web Tokens (JWT) are popular. They offer a secure way to verify users. OAuth2 is another option. It allows third-party access without sharing passwords. Use HTTPS to encrypt data. It protects information during transmission. Strong passwords also enhance security.
Authorization Strategies
Authorization determines user permissions. It controls what users can do. Role-based access control (RBAC) is widely used. It assigns permissions based on user roles. Admins can access more features. Regular users have limited access. You can also use attribute-based access control (ABAC). It considers user attributes for permissions. Secure your API endpoints with these strategies. This prevents unauthorized actions.
Testing Your Api
Learn how to build a REST API using Node. js and Express. This guide covers setting up, routing, and testing your API. Perfect for beginners.
Testing your API is a crucial step that ensures it works as intended and is reliable. After building your API with Node.js and Express, you need to verify its functionality. This process helps identify bugs and issues early, saving you headaches down the road. Testing can be automated, manual, or a mix of both, each with its own advantages.Automated Testing
Automated testing involves using software tools to execute pre-written tests on your API. These tests are like scripts that check if your API behaves as expected. Tools like Mocha, Chai, and Jest are popular choices for Node.js applications. Imagine you have an endpoint that retrieves user data. You can write a test that sends a request to this endpoint and checks if the response matches expected results. Automated tests can run every time you update your code, ensuring nothing breaks unexpectedly. This is particularly useful for large projects with multiple developers. Think of automated testing as a safety net. It allows you to confidently add new features without fear of breaking existing functionality. Have you ever experienced a frustrating bug that disrupted your workflow? Automated tests help prevent such scenarios by catching issues early.Manual Testing
Manual testing involves interacting with your API as a real user would. This means sending requests and checking responses without automated scripts. Tools like Postman can help you manually test your API endpoints. When manually testing, consider scenarios that users might encounter. For example, test how your API handles incorrect input or missing parameters. Manual testing provides a user-centric perspective, uncovering issues that automated tests might miss. While automated tests are efficient, manual testing gives you a deeper understanding of your API’s user experience. Have you ever discovered a bug only after using a feature yourself? Manual testing can replicate this firsthand insight, ensuring your API is user-friendly and robust. Testing is a critical part of API development. By combining automated and manual approaches, you build an API that is both reliable and user-friendly. What testing strategy do you find most effective for your projects?
Credit: www.callicoder.com
Deploying Your Api
Deploying your API is the final yet crucial step in bringing your project to life. This is when your work gets to shine and be accessible to users around the globe. But how do you deploy your REST API built with Node.js and Express? Let’s break it down into manageable steps.
Choosing A Hosting Provider
First, you need to choose a hosting provider. There are many options out there, but some of the most popular ones include Heroku, AWS, and DigitalOcean. Each of these has its pros and cons.
For instance, Heroku is very user-friendly and great for beginners. AWS offers more flexibility and scalability but can be a bit complex. DigitalOcean provides a balance of ease and power, making it a solid choice for many developers.
Think about your project’s requirements. Do you need something simple and quick? Or are you looking for more control and features? Your choice will depend on these factors.
Deployment Steps
Once you’ve chosen your hosting provider, it’s time to deploy your API. Let’s take Heroku as an example. First, you’ll need to install the Heroku CLI.
Open your terminal and run:
npm install -g herokuNext, log in to your Heroku account:
heroku loginCreate a new Heroku app:
heroku create your-app-nameThis command will set up a new app and give you a unique URL. Now, it’s time to push your code. Make sure you have a Procfile in your project root, specifying how to run your app:
web: node your-app-file.jsCommit your code to Git, if not already done:
git add .
git commit -m "Initial commit"
Push your code to Heroku:
git push heroku masterOnce the push is complete, your app will be deployed. You can now visit your API at the URL provided by Heroku. Test it out to make sure everything is working as expected.
Deploying might seem daunting, but breaking it down into these steps makes it manageable. Have you deployed a Node.js app before? What challenges did you face? Share your thoughts in the comments below!
Frequently Asked Questions
How To Create A Rest Api With Node.js And Express?
To create a REST API with Node. js and Express, install Express using npm. Set up a new Express app. Define routes and HTTP methods. Use middleware for parsing JSON. Implement error handling. Finally, listen on a port.
Is Node.js Good For Rest Api?
Node. js is excellent for REST APIs due to its asynchronous nature and non-blocking I/O. It handles multiple requests efficiently, enhancing performance. With its vast library ecosystem, developers can easily build scalable and fast APIs. JavaScript’s popularity also ensures a large community support for quick problem-solving.
Is Express Good For Rest Api?
Yes, Express is excellent for REST APIs. It offers simplicity, flexibility, and efficient performance. Its extensive middleware support streamlines development and handles HTTP requests seamlessly.
How To Deploy Node.js Rest Api?
Deploy a Node. js REST API by pushing code to a server, installing dependencies, and using a process manager like PM2.
Conclusion
Building a REST API with Node. js and Express is straightforward. It’s a practical skill for modern web development. You learned the basics in this guide. Start small, then expand your project. Experiment and solve real-world problems. Remember, practice makes perfect.
Use these skills to enhance your applications. Stay curious and keep learning. Your journey with Node. js and Express is just beginning. Embrace challenges and enjoy coding. Happy coding!